How to Address an Envelope

How to Address an Envelope
Letter writing is a lost art. In today’s world of ultrafast email and near-instantaneous text messages, the humble handwritten letter has suffered a steep decline. And that’s a shame because you can’t match the emotional appeal of handwritten communications. There’s something visceral about opening a physical letter, seeing the hand-scribed words scattered across the page, and reading the sender’s thoughts set down in ink.
Thankfully, handwritten cards and other “snail mail” options are making a comeback. Consumers, tired of the antiseptic quality of digital communications, are revisiting the warmth and connectivity that’s only possible with handwritten letters. Businesses are discovering that handwritten communications are an excellent way to reach their prospects and customers, enjoying a 99% open rate! And recipients everywhere are thrilled that more hand-addressed envelopes are showing up in their mailboxes than have in a very long time.
Those of us caught up in the digital world of automated bill payment, email, and chat, may not remember the finer points of how to address an envelope. And some younger people may never have learned. So, in the spirit of boosting a communications mode that’s near and dear to our hearts, we present a quick primer featuring everything you need to know about how to address an envelope. It's the first step in mailing a letter.
SEE ALSO: What I Learned Sending 1,000,000 Handwritten Notes

HOW TO ADDRESS AN ENVELOPE: THE BASICS
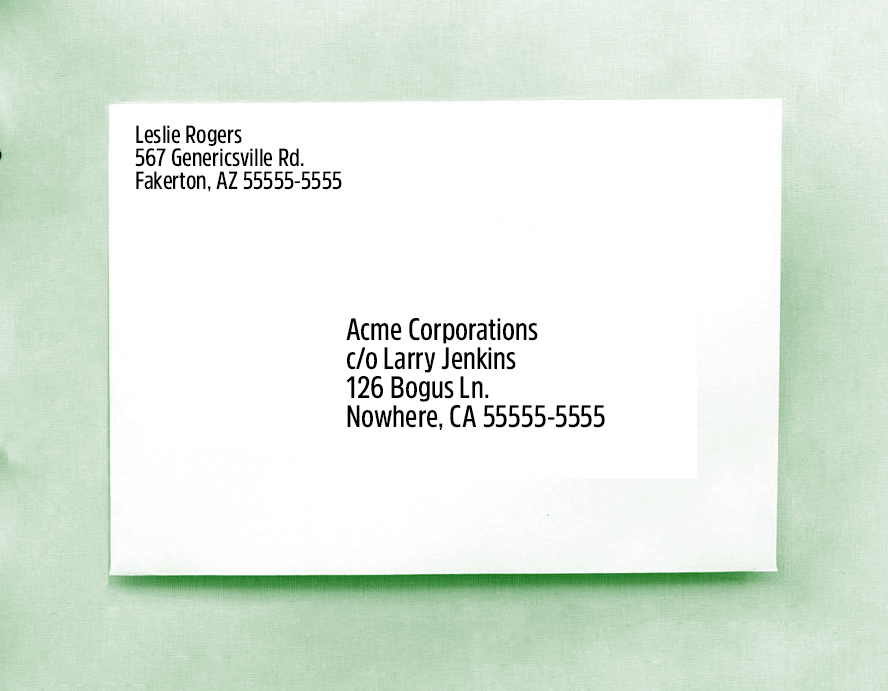
There are three main elements of a fully executed envelope, the recipient’s address, the sender’s return address, and the postage. Each has a specific location on the envelope designated for placement. Remember that you should write on the back of the envelope, That’s the side without the closing flap.
Without the recipient’s street address, the post office wouldn’t know where to send your letter. You’ll center the first line of this address in the middle of the envelope and then add all additional lines below the first.
Stamps are just as important as the recipient’s address. Without proper postage, your letter or card will be returned to you unsent. Postage is placed in the upper right corner of the envelope. If it's placed anywhere other than the upper right-hand corner, your letter may not be delivery.
Finally, we have the sender's address or the return address in the upper left-hand corner — that’s your address. Technically, this isn’t required. Assuming you’ve used the right recipient address and applied sufficient postage, your letter will arrive in your recipient’s mailbox even without a return address. However, it’s strongly recommended that you add one because if you don’t, and there’s something wrong, the post office won’t know who to return the letter to. Your return address goes in the top left corner.
SEE ALSO: How to Write an Opening to a Letter

PROPERLY FORMATTING THE RECIPIENT’S ADDRESS
For domestic U.S. mail, you should use conventional address formatting standards. This means starting with the recipient’s name. In the case of a business, start with the business name and then add the recipient’s name on the next line, prepended by “ATTN:” or “c/o”.
Once your recipient is designated, place the street information on the next line down. Long street addresses can be split into two lines if necessary.
Below that, (the third line in a standard address) add the city/state/ZIP code portion of the address, all on the same line. For domestic mail, a country name isn’t required. We’ll look at foreign mail shortly. Ensure that you properly address this section. Failing to use the correct address or the entire address will likely cause your letter to be sent back to you.

ADDING THE RETURN ADDRESS
Again, while not required, a return address is advisable. Start the recipient’s name in the top left corner of the envelope. Similar to the recipient’s address, if there’s a business name, that supersedes the recipient’s name in address order.
Next add the street address on one or two lines, as needed, and follow up with the city, state, and ZIP code. For both the recipient and return addresses, it’s recommended to use the full nine-digit ZIP code, even if the second line is long.
A complete ZIP code is formatted like this:
55555-5555
This includes the standard five digits we’re used to, plus an additional four digits after a dash, which designate specific mail delivery routes. The more information you give the post office, the faster they can deliver your mail.
If you don’t know your or your recipient’s four-digit extension code, the USPS website has a handy tool for finding it. Simply enter the address in question, click “Find” and the site will return the full, official address including the correct four-digit extension.
SEE ALSO: When You Should Send Out Cards

AFFIX YOUR POSTAGE
Adding stamps is simple, and even easier now that peel and place stamps have replaced the old “lick and stick” variety. If you have a single stamp, you’ll place it in the top right corner of the envelope. For more than one, place the first in the top right corner and then place additional stamps to the left of the first. Affix it to the envelope properly so that it doesn't fall off.
It’s important to use sufficient postage. Stamps are how you pay for delivery, and if you don’t apply enough, your mail will be returned. First-class postage for a letter under one ounce costs $0.55. Purchasing forever stamps is a good idea. These are worth whatever first-class happens to be at the time they’re used. Right now they’re worth $0.55. If the price goes up to $0.65 a few years from now, the forever stamps value will grow to match.
If your mail is heavier than one ounce, you’ll need more than one stamp. To determine how much postage is required, you can check this updated USPS postage rate page. It describes the United States Postal Service and its various rates and requirements. You’ll also need a scale to weigh your mail.
SEE ALSO: First-Class Mail vs. Standard Mail

MAILING TO MILITARY ADDRESSES
Addressing an envelope for a military destination follows the same placement protocols as a standard location. The format of the address is very similar, too, with a few notable exceptions:
- Instead of a city, you’ll see an abbreviation designating the type of military installation you’re mailing to: FPO (Fleet Post Office, APO (Air/Army Post Office), or DPO (Diplomatic Post Office.)
- In place of the state, another abbreviation designates the duty station: AA (Armed Forces America), AE (Armed Forces Europe) and AP (Armed Forces Pacific.)
- The ZIP code structure remains the same. However, some military addresses require all nine digits, so it’s good practice to use them by default.

MAILING TO INTERNATIONAL ADDRESSES
Like military addresses, the basic format — return address, recipient address, postage, from left to right — stays the same. Just be sure to copy your recipient’s address exactly as it’s written, because the formatting will likely be different from domestic addresses. Be sure to include the country name at the bottom. Also, remember to check how much postage you’ll need for international mail.
Does the Shape of the Envelope Matter?
As long as your supply enough postage, any sized envelope you purchase at the store will work just fine in the mail. The dimensions are less important than the placement of the addresses and stamp.
The beautiful thing about the method described above is that it applies to any four-sided envelope shape — no matter how long, tall, short or squat an envelope might be, the stamp always goes in the upper right, the return address in the upper left, and the recipient's address smack dab in the middle.
Does It Matter What Color Ink You Use?
You can use any color ink you like, as well as any color envelope. However, you have to ensure that your addresses are legible. You wouldn't want to write your addresses in red on a red envelope or dark blue ink on black paper. In both of these cases, the post office would have a very difficult time making out the text, a recipe for certain failure.
Whichever colors you choose, make sure you create good contrast between the ink and the paper. The better the contrast, the more likely it is that your letter will reach its destination.
Will a Poorly Addressed Letter Be Returned to Sender?
It depends on what's wrong. If you're missing postage, or if you didn't add enough your letter has no chance of arriving at its destination. An improperly formatted recipient's address may still pass muster as long as the post office can work out what the address should have been. Small mistakes can often be corrected for. However, large mistakes or omissions of important elements dramatically increase the chances that the service won't be able to identify your desired address.
The exception is the return address. You can leave this off entirely and, as long as everything else is correct, your letter will arrive where you intend. However, if something is wrong, your letter will be lost forever as, without a return address, USPS won't have any way of identifying whom should receive the return.
A PROPERLY ADDRESSED ENVELOPE IS THE START OF A GREAT LETTER
Writing letters is a lost art, but its revival is already underway! Now that you know the basics of how to address an envelope properly, why not put pen to paper and get your message to its destination?
After all, there’s no better way to spread love, joy and good feelings than by writing a letter. And who doesn’t love getting mail? Start writing and mailing today, and you may be surprised by the happiness it brings.


